Sunday, March 8

"Sweet as Apple Pie"

There is nothing better than a warm homemade slice of Apple Pie. Lets face it, when you hear those two words all you can think of is a buttery flaky crust and sweet fragrant apples melting in your mouth with a cold scoop of vanilla bean ice-cream or whipped cream. The Apple Pie is an American Tradition. It's the pie that brings the family around the table at Thanksgiving or the pie that is served with red white and blue plates at the Fourth of July beach party. It's the pie that your Grandmother always made when you visited, and she somehow knew the recipe by heart. The Apple Pie is so versatile and is yummy for anytime, not just a holiday or family gathering. I hope you will enjoy my take on this delicious American Tradition and try it for yourself! 


Ingredients:

for the pie dough 
3 1/2 cups all-purpose flour 
2 tablespoons granulated sugar
1/2 teaspoon salt
3/4 cup (1 1/2 sticks) very 
        cold butter cut into 1/2 inch pieces 
1/2 very cold water 

for the apple filling 
6 large tart apples
1/2 cup firmly packed light brown sugar
2 tablespoons all-purpose flour
1 teaspoon ground cinnamon 
1 teaspoon vanilla extract 
1 tablespoon fresh lemon lemon juice 


1. First make the pie dough: In a large mixing bowl, combine 2 1/2 cups of the flour, the granulated sugar, and the salt. Using a wooden spoon, stir until well blended. 

2. Drop the diced butter pieces into the flour mixture. Using a pastry blender (can be found at any grocery store) work the butter and the flour mixture together by rocking the pastry blender back and forth and up and down using a chopping motion. Keep in mind that the butter needs to be really cold! After a few minutes the mixture should looks like course crumbs with few pieces of butter still visible. 

3. Pour ice cold water over the mixture and stir together until the mixture becomes moist crumbs. Dump crumbs onto a clean and floured work surface. Divide into two equal piles and using your hands, press each pile into a flat disk. Wrap disks separately in plastic wrap and refrigerate for at least 30 minutes. 


4. Make the apple filling: Using a vegetable peeler, peal each apple and then cut into about 8 pieces. Each piece should be about 1/2 inch thick to ensure plenty of apples for each slice of pie! Pile the slices in a bowl and add the brown sugar, flour, cinnamon, and vanilla. Stir until blended.  


5. Preheat the oven to 425 degrees F. Remove the dough from the refrigerator. 

6. Sprinkle the work surface with the remaining cup of flour. Unwrap 1 disk of the dough and using the rolling pin flatten out the top a bit. 

7. Sprinkle more flour on the top and on the rolling pin and begin to roll out the dough. Start in the center of the dough and roll towards the edges. Repeat this until the circle is about 14 inches in diameter and about the same thickness throughout. Don't worry if its not a perfect circle because its going to be on the bottom of the dish anyways.

8. Roll the dough onto the rolling pin and carefully transfer onto your 9-inch pie dish (I used a pyrex dish). Using your fingertips, gently press dough into the dish. 

9. There are many different options for the top of an apple pie. You can create a lattice design or a full top with slits, or basically anything that your heart desires. This was my first time making a homemade pie crust so I found that my second disk of dough was very dry. I improvised by making a crumble top pie. To do this I basically pulled apart the dough and dropped it over the apples. I then sprinkled 1/4 cup sugar on the top to give it some more texture.


10. Bake the pie until the top is golden brown and the apples are tender, about 1 hour. Test the pie by inserting a knife in the top. The knife should glide easily into the slice. Remove pie from the oven and cool on a backing rack until ready to serve. 

11. When ready to serve the pie should still be warm. Top each slice with a dollop of sweetened whipped cream and ENJOY! 
 

Wednesday, March 4

Update!

Hello everyone. I haven't posted in a few days because I have been bogged down with homework. I just wanted to let you know that I have created and email for this blog. This means you can email me your suggestions or any comments or questions you may have about a recipe. 

The email is, ConfessionsofaBakeaholic@gmail.com 
Feel free to email me anytime you want and I will get back to you ASAP! 

Friday, February 27

A Cookbook for Everyone


I recently discovered Martha Stewart's Cooking School: Lessons and Recipes for the Home Cook. This cookbook is filled with amazing recipes, tips, and even lessons that correspond with the chapters. One of my favorite aspects of this cookbook is the fact that it has pictures of all the recipes. For me, every cookbook I buy must show pictures. How else am I supposed to know what the final product is supposed to look like? Also, having pictures just makes it more fun. Anyways, this cookbook is laid out very clearly and has really useful tips for beginers. Wether it be learning about tools or learning to select the perfect vegetables, this book really has it all. 

I am particularly fond of the dessert section in this book. She has some really simple and very classic desserts such as yellow butter cake with easy chocolate butter-creamdouble crust apple pie, chocolate souffle, and much more. the best thing about it is that every one has a picture for every step (REPEAT: EVERY STEP!!!!). GAhhhhhhh, so amazing. and the number in the corner corresponds to the step number. That is so beautiful that I could cry. I HIGHLY recommend that everyone purchase this book. 

I am looking forward to trying a few of these recipes and seeing if my results look as good as Martha's do! 


image source: 
http://www.amazon.com/Martha-Stewarts-Cooking-School-Lessons/dp/0307396444

Monday, February 23

Spring Cupcakes

I almost died of happiness when I saw this picture...

These cupcakes are by Paula Hennig. Her flickr account has SO many gorgeous pictures of treats that I can hardly wait to go through them. Take a look at them by clicking on her name above. You may be inspired by some of her work. 

These cupcakes would be perfect for a spring garden party, tea, birthday party, wedding shower, baby shower, easter party, and so much more! 

I believe these are chrysanthemum flowers. the colors are really great because they are bright without being in-your-face neon. I am so excited to try and recreate these scrumptious looking cupcakes! 

A few Lessons I have learned over the years...

This is part one of a series of tips that I hope to continue throughout the next few months. 

#1 Always let the cake completely cool before trying to put frosting on it. If you don't, you will end up with frosting filled with crumbs. 

#2 Always cool cookies, cupcakes, and cakes on a wire rack. This ensures that they don't get all soggy. It is especially important for cookies because cooling them on a rack gives them a nice crisp texture and they won' fall apart when you pick them up.

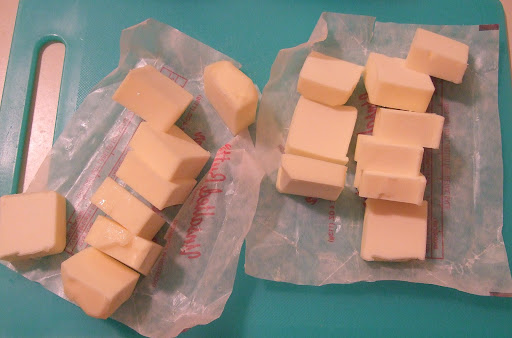
#3 Bring butter and eggs to room temperature (unless the recipe says otherwise) for baking. A good way to bring butter to room temperature if you forgot to set it out before is to dice it into cubes on a plate and let it sit for a moment. This way, more surface is exposed to heat and it melts faster. NEVER put butter in the microwave to soften it. It will melt and the texture will not hold up frostings and batters. 

#4 Be sure to understand the difference between  4 Cups of Flour, Sifted and 4 Cups of Sifted Flour . Yes, it matters!  The first one calls for 4 cups of flours which you then sift. The second calls for sifted flour which you then measure out 4 cups of. 

#5 If you don't own a piping bag , you can always use a ziplock bag for applying frosting to cupcakes and cakes. All you have to do is put your frosting in a bag (you will need a larger size, like freezer bag size or something), zip it shut, and snip of the corner of one edge. Start by only cutting a small bit off and increase the size little by little. It's kind of a pain when you realize the hold is too big and you have to transfer all the frosting. 

Product Review: Sprinkles Cupcake Mix


Have you ever woken up in the middle of the night yearning for a decadent cupcake, especially a Sprinkles Cupcake? Unless you had happened to go to Sprinkles that day, this would be a major dilemma. Sprinkles Cupcakes are almost a food group of their own. They were made famous years ago and basically started this whole Cupcake Craze that has taken over the world. 


I discovered Sprinkles Cupcake Mixes from Williams-Sonoma last year  and let me tell you, they have come in handy. They are easy to whip up in a second and they are really good. The cake is a little denser than grocery store cake mixes, which I really like because I find the grocery store ones wayyy to light and they always fall apart. Also, the Butter-cream frosting recipe that comes with the mix is the easiest thing ever! I have used it for the past year for other cupcakes and cakes and people really like it! I have only tried the vanilla and chocolate mixes but I know that Williams-Sonoma also carries red velvet, banana, and I think they used to have lemon. They also have some seasonal ones like chocolate peppermint for Christmas Time. 

Below are some photos of the vanilla cupcakes that I made a few months ago. I also added some moist coconut flakes on top to add some more flavor. I am basically addicted to coconut. *Baking Tip: Covering cakes and cupcakes with coconut is a great way to hide flaws if you are not fabulous at applying frosting! 

                                                    They even come with the little dots to stick on top! 
                                                                 Warning: Do not eat the dots.....they are pretty disgusting

Celebrating Mardi Gras!


Tomorrow, Feb 24th, is MARDI GRAS!!!!!!! 
It is also called "Fat Tuesday" and is the last day before Ash Wednesday or "lent". Many people fast during lent, usually giving up something that is hard for them to give up (like candy or fast food). I attempted to give up chocolate one year....that failed miserably. Anyways, this "Fat Tuesday" is a very big deal to one particular place called  NEW ORLEANS! Seriously, this place is home to some of the best food on the planet. One of the traditions that is celebrated in new Orelans is the making and consuming of the "Kings Cake" on Mardi Gras. 

The history of it is very interesting and you can read up about it on 
 http://en.wikipedia.org/wiki/King_cake

Here is a recipe for a Kings Cake from Chef Emeril Lagasse 
(http://www.gumbopages.com/food/dessert/king-cake.html) 

  • 2 envelopes active dry yeast
  • 1/2 cup granulated sugar
  • 1-1/2 sticks (6 ounces) unsalted butter, melted
  • 1 cup warm milk (about 110°F)
  • 5 large egg yolks, at room temperature
  • 4 1/2 cups bleached all-purpose flour
  • 2 teaspoons salt
  • 1 teaspoon freshly grated nutmeg
  • 1 teaspoon grated lemon zest
  • 1 teaspoon vegetable oil
  • 1 pound cream cheese, at room temperature
  • 4 cups confectioner's sugar
  • 1 plastic king cake baby or a pecan half
  • 5 tablespoons milk, at room temperature
  • 3 tablespoons fresh lemon juice
  • Purple-, green-, and gold-tinted sugar sprinkles
Combine the yeast and granulated sugar in the bowl of a stand mixer fitted with a dough hook. Add the melted butter and warm milk and warm water. Beat at low speed for 1 minute. With the mixer running, add the egg yolks, then beat for 1 minute at medium-low speed. Add the flour, salt, nutmeg, and lemon zest and beat until everything is incorporated. Increase the speed to high and beat until the dough pulls away from the sides of the bowl, forms a ball, and starts to climb up the dough hook. If the dough is uncooperative in coming together, add a bit of warm water (110 degrees), a tablespoon at a time, until it does.

Remove the dough from the bowl. Using your hands, form the dough into a smooth ball. Lightly oil a bowl with the vegetable oil. Place the dough in the bowl and turn it to oil all sides. Cover with plastic wrap and set aside in a warm, draft-free place until doubled in size, about 2 hours.

Meanwhile, make the filling. In a large mixing bowl, combine the cream cheese and 1 cup of the confectioner's sugar. Blend by hand or with an electric mixer on low speed. Set aside.

Line a baking sheet with parchment paper.

Turn the dough out onto a lightly floured work surface. Using your fingers, pat it out into a rectangle about 30 inches long and 6 inches wide.

Spread the filling lengthwise over the bottom half of the dough, then flip the top half of the dough over the filling. Seal the edges, pinching the dough together. Shape the dough into a cylinder and place it on the prepared baking sheet seam side down. Shape the dough into a ring and pinch the ends together so there isn't a seam. Insert the king cake baby or pecan half into the ring from the bottom so that it is completely hidden by the dough.

Cover the ring with plastic wrap or a clean kitchen towel and place in a warm, draft-free place. Let the dough rise until doubled in size, about 45 minutes.

Meanwhile, preheat the oven to 350°F.

Brush the top of the risen cake with 2 tablespoons of the milk. Bake until golden brown, 25 to 30 minutes. Remove from the oven and let cool completely on a wire rack.

Make the icing. Combine the remaining 3 tablespoons milk, the lemon juice, and the remaining 3 cups confectioner's sugar in medium-size mixing bowl. Stir to blend well. With a rubber spatula, spread the icing evenly over the top of the cake. Sprinkle with the sugar crystals, alternating colors around the cake.

The cake is traditionally cut into 2-inch-thick slices with all the guests in attendance.

YIELD: 20 to 22 servings